facebook

Sunday, October 28, 2012

Halloween is the season of love

Wednesday: Me, "We have that party, what are you going to be?"
     He, "I don't know, should we do a couples thing?"
Thursday: Me, "How about a dead couple? Zombies?"
     He, "Meh."
     Me, "We could put you in a coffin."

and an idea was born....


Saturday:
 And he's not wearing pants, 'cause, you know, they don't dress corpses below the waist....


And that, my friends, is how you stay married for twenty years.

Tuesday, October 16, 2012

"snakes. I hate snakes"

This is what I kept thinking while doing this little project.  Remember Indian Jones?  Actually, I was thinking the same thing about hot glue gun glue that does that stringy, webby, thing all over.  Am I the only one this happens to?  Anyhowsers, I pinned this neat, but kinda creepy snake wreath thing a few months ago.  Thought if I was going to do it myself, I'd better get on it, since Halloween is coming up hard and fast.
Here's my version:
First, get a wire wreath.
Then, get yourself some snakes.  Lots of them.  I ordered mine from Amazon, but misread the description and ended up with snakes littler than I anticipated.  But I'm cheap and wouldn't have sprung for bigger snakes anyway.


The requisite hot glue gun...
Start glueing.  The first row is the hardest, but I just worked my way clockwise and stacked and twined my way around (and around and around)


Probably took me 30 minutes and a couple of glue burns.


The pinterest one is sprayed black, but I'm grooving on the multicolors.
Whatcha think?

Wednesday, September 26, 2012

how to skin and gut a tomato (a tutorial!)


So my mom said she stopped reading my last post at "peel and seed tomatoes".  Lots of you felt the same way.
Here you go, another tomato tutorial right on the heels of the last one.  Hope it helps!

You are going to need: a saucepan of boiling water, a bowl in the sink of ice water, a trash can, and a knife.

First, core a few tomatoes (I do five at a time; it's a manageable number for me, but gets the job done without taking all day).  


Drop them in the boiling water for about half a minute.  


As you take each tomato out of the ice water, you'll notice the skins are coming off.  Help that process along a little as needed, but it kind of does itself (yeah!).
Last step; stand over the trash/compost bin, aim the cut end down and give 'er a squeeze.  The seeds and gunk squish right out and you can toss the rest in the food processor. 
Bam, done.
Go forth, and beat up a tomato..

Tuesday, September 18, 2012

salsa canning: a tutorial for the masses

I have managed to grow exactly four tomatoes this year and the dog ate three of them off the vine when I wasn't looking.  BUT a quick trip over the pass to eastern Washington and I became the proud owner of a box of tomatoes!  
Therefore, and because I'm out of last years supply, it's salsa making time and the Alati house.  All other things must come to a halt, 'cause these buggers are going to rot if I don't get on it.
Ever made salsa? Not rocket science, but you do need tools (neat!).  When you're done, they can all live together in the canner.


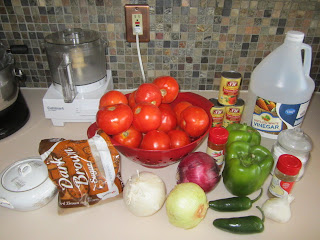
Here's what you need:
a tall canner
jar lifter
jars and lids the size you want
lid lifter
canning funnel
I picked up all this stuff years ago at Ace Hardware.


Salsa recipes are all over the place, but my go-to is from Allrecipes.com, called rockin' salsa
Ready for instructions?  Here ya go
boil your jars in the canner, put the water on now, it takes forever.
blanch, peel and seed the tomatoes.  toss in food processor and chop up using the pulse setting (that will chop your product, not beat it into mush).  Pour into a BIG stock pot.  Do the same with all the other ingredients.  bring to a simmer and let it go for a couple of hours.  Shuttle a kid to a friend's house and back, notice the front of your oven is disgusting and go at it with a bamboo skewer and microfiber towel, read a book, whatever.
The salsa will go from this:

To this:


Put the lids to the jars on the stove in a enough water to submerge them and bring to a boil.  let them simmer for 10 minutes or so.  Your jars should be nice and hot (man, I hope you haven't been boiling them all this time, your house is going to be HOT! just keep everything hot).


Take the hot jars out of the hot water bath.  Use a ladle and the canning funnel, fill the jars with your hot salsa, to within about 1/2 inch of the top. 

 use your lid lifter (it's a little magnet on the end of a plastic stick that lifts those hot lids from the hot water), and place a lid on each full jar.  screw on the bands, to just finger tight.  This is important: DO NOT tighten the bands down!  you're just putting them on, but giving the air a way to escape when you process the salsa!

Now, put all those now filled jars of salsa back in the canner, crank up the heat so it's simmering, not boiling like crazy, make sure everybody is covered with water, put on the lid and let it "process"/simmer for about 15 minutes.
Carefully take out the salsa and let the jars cool to room temp.  You'll know you're good to go when none of the jar lids bounce back when you push on the tops.  If the top pushes down, that's the stuff you put in the fridge and eat sooner rather than later.  Bring it to work, people will think think you're the bomb!
Did you get all the times I said HOT there?  It's important to note 'cause you don't want to do this with your toddler helping you.  Filling the jars doesn't take that long (like, maybe 5 minutes), but it IS a hot, potentially messy, process, and you want to do this with your full attention and only risking burning yourself!
This salsa tastes great, and is even better after sitting on the shelf for a while.  You can make it hotter, smokier, whatever, but the process is the same.  People have been canning for years and you should too.  You'll be so proud you did!
Next up, dilled green beans!


Thursday, August 2, 2012

just when you think you have a slacker chicken


So Azul, the weird looking chicken had been laying pretty nicely.
Then suddenly nothing.  I gave up trying to be a chicken psychotherapist after the first year of having them in our midst.  They're weird.  And have little tiny brains; who knows what goes on in there.
So no eggs from Azul.  Whatever.
Then yesterday, Izzy found this.
Hmmmm, who's been laying eggs NOT in the coop?  in the barn. behind a plastic lid. in the gravel.
18 of them?!

The rest of the family is refusing to eat them.  But really, our version of summer hasn't been hot.  And a few days out?  I'm willing to take the chance.  So two were had for breakfast this morning.  We'll see if I'm regretting my decision by noon.
And maybe I should redecorate the boxes or something to make it more pleasant to lay eggs where they are supposed to be laid.  

Thursday, June 7, 2012

Holy Toledo I finished it!

 I started this in January when the power went out.


Here it is, spring in the great Northwest, also known as Junuary, and I've finally finished!
The kit has enough yarn to make two of these...anyone want some yarn and instructions cause I'm never doing this again!


We now return to our regularly scheduled life..

Only one more week of school and I can stop getting up at the crack of dawn to make lunches!  Can't wait!


Sunday, May 27, 2012

all these great recipes and no where to go!

Oh blogging world, I have a love hate relationship with you.  I love reading all these blogs, and there's that whole pinterest addiction too.  But the recipes are coming out my ears!  I can't find a good way to save/organize/remember all this information!  I'm overloaded!  Look at all the exclamation points I'm using! That should be proof!  Someone help me stop the madness here.  Who has a good idea for keeping, storing, remembering that I have a recipe somewhere for (fill in the blank)?

Monday, April 16, 2012

I'm dieting, so I made whoopie pies to torture myself

 Chocolate peanut butter whoopie pies.

 I was in a baking mood, what can I say?
At least my family got to enjoy them.

The recipe came a from a whoopie pie book (who knew there was an entire book of whoopie pies?) my mom gave me for Christmas.  It's taken me this long to get to it, but oh, I'll be back, that's for sure! 

Best part?  pretty stinkin' east to make.  So here you go...

Chocolate Whoopie Pie

Oven: 375 degrees.  big cookie sheet lined with parchment paper

1 2/3 c. flour
2/3 c. unsweetened cocoa powder
1 1/2 tsp baking soda
1/2 tsp salt
4 tblsp butter
4 tblsp shortening
1 c. brown sugar
1 egg
1tsp vanilla
1 c. milk
Beat the butter, shortening, and sugar together until light and fluffy.  Add egg and vanilla and beat some more.  Add dry ingredients alternatingly with milk.  beat until smooth. drop tablespoon sized dolops of dough onto cookie sheet, allowing at least 2 inches in between.  cook about 10 minutes, or until the tops spring back when touched.  cool on wire rack completely.  fill with peanut butter filling.  makes around 24 completed pies (if you stay out of the batter, which is hard!)

Salted Peanut Butter Filling
3/4 c. peanut butter
6 tblsp butter
3/4 c. confectioners' sugar
1/2 tsp salt.
mix until smooth.  spoon into a ziploc bag, cut a corner off and squish out onto half the cookies.


Saturday, March 31, 2012

Faking Our Way Through Easter Decor

Left over plastic eggs, check.

Spring-ish paper from Michael's, check

Willing girl child helper, check.

Vague idea of a plan from Pinterest, but can't find the tutorial because my boards are a mess, check.


So the Iz and I set out to make our spring time eggs.  

I cut the paper big enough to around the egg, then fringed all the edges so it would fold nicely--in theory.

We broke out the Modge Podge and went to town.  


45 minutes later we had covered the eggs, with paper, but mine were a whole lot more rumpled and slidey (it's a new word!).

Iz and I were completely covered in podge.

And drying them was kind of a challenge.  Newspaper is a bad idea, in case you were thinking of doing that; modge podge is indiscriminant in its willingness to stick paper to eggs.


But they finally dried, I found some moss and a cake plate and they look pretty good under glass.


And it's a project done. completed. finished. checked off.  And we can all move on with our lives, after we get this podge off our elbows.

Monday, March 19, 2012

Proof of Slacker Parenting Found in the Closet

Why is the American Girl doll in the closet?  Because the 11 year old owner watched Chuckie on Netflix while her mother was sewing.

Oops.

 But look at the cute bag I finished!

If that's not worth a doll spending a day or two in the closet, I don't know what is.

I'll pay for her therapy later (the daughter's, not the doll's).

Like when I sell the bag..

Thursday, March 15, 2012

The Hen Has More Chicks


I mean really, who can resist these?  The boys in the family were against it, but we girls (including the other hens, I like to think) won.

This is one of the men who hates chickens.  For the record, I'm not the one who brought them in the house this morning...


So it's Freddy, Hazel, and Dorothy added to Blanca, Karen, and Azul.  Yes, the names all mean something, but it's ridiculous to get into.

Yeah for spring chickens and (if it stops snowing and blowing here) Spring!

Tuesday, March 6, 2012


Thank goodness the sun came out.  I was beginning to feel as though I'd never see blue sky again.  The crocuses (or is it crocusi?) came out in full force today in my flower beds.  Apparently they've had a busy winter spreading themselves willy-nilly; love it!

Now if the grape hyacinths would bloom before the elk find them, my spring will be nearly perfect!


And speaking of perfect (nice segway, no?), how about these new diaper bags?


New baby, new bag; it's Spring (well, nearly)!


enjoy the weather and the newness that is this time of year....


EclecticHen.etsy.com

Sunday, February 19, 2012

rage cleaning

My first day off work this week saw me cleaning the house for SIX hours.  By the time I was done, I was ready to toss the rest of the family out to live in the camper indefinitely.  You would think no one else knew where the trash can was.  sheesh. 

But I'm better now.   
I'm finally getting to the diaper bags I've been promising people.  A friend ordered one with owls.  Here's what I was fiddling with today.  What do you think?  The inside of the bag is the same fabric as the owl's wings...


My beloved (who is still being allowed to live here, even after my cleaning rage) says it looks as though the owl has wrapped himself up in a blanket. But he's taking me out to dinner, so I let the comment slide (and I think he might be right, now that I'm looking at it).

I see a margarita in my future...

Sunday, February 5, 2012

Well that was easy. a tutorial

Valentine headband and gloves

So there I was at JoAnn's the other day and gloves and headbands were a buck.  Why would I not buy them?  I needed something Valentine-y for the girl child, and thought they were a good place to start.  And if my little project was a complete disaster I was out--a buck. 
I do have to give credit to Etsy and Yastikizi for the glove idea.

Valentine's Day is coming; it's not too late to try to do this.  It probably took me a total of 20 minutes to make up the headband and gloves.  So here's the tutorial, such as it is.

Step one:  get a headband, gloves, and a square of red felt.  Bring home.
Step two:  cut out some various sizes of felt heart shapes.  I figured out the correct size for the gloves by, well, cutting a couple hearts in half holding them to the palm of the glove (told you this was easy).
Step three:  for the gloves, I put each one on my hand, placed the half where I wanted it, and held it in place while I took off the glove.  That's about the trickiest part of the whole project.


Step four:  pin the heart halves to the gloves, get yourself a needle and thread and baste around the each half, obviously making sure you only have one layer of glove when you're sewing.
For the headband, arrange some of the various size hearts and tack the center of each heart to the band with a needle and thread.  I put the headband on after a few, noticed the blank spots, and stuck on a couple more.


Step five: present gift and prepare to be loved!